The SPROG is a computer based programmer for DCC decoders. Actually the SPROG II is obtainable in an USB version. Information about SPROG II can be found at http://www.sprog-dcc.co.uk/.
The USB-Version includes a so called FTDI USB Single Port Serial Converter. Unfortunately this special type is currently not directly supported by linux. After connecting the device to the USB Port and setting up the power for SPROG, the command lsusb contains a line like this:
Bus 003 Device 009: ID 0403:f0c8 Future Technology Devices International, Ltd
Here is 0403 the vendor ID and f0c8 the product ID. There are two possible solutions:
Solution 1:
As superuser root call every time after connecting the SPROG the command modprobe ftdi_sio vendor=0x0403 product=0xf0c8. It's also possible to include the line options ftdi_sio product=0xf0c8 vendor=0x0403 in the file /etc/modprobe.conf.local, then the command abbreviates to modprobe ftdi_sio.
Solution 2:
If you want to detect the SPROG automaticly, it depends on your distribution. If you have a system with "udev", then include in /etc/udev/rules.d/50-udev-default.rules (or wherever the rules are situated) the line
SYSFS{idProduct}=="f0c8", SYSFS{idVendor}=="0403", RUN+="/sbin/modprobe -q ftdi_sio product=0xf0c8 vendor=0x0403"
If you have a system with the older hotplug, then there is the file /etc/hotplug/usb.handmap, which has to be changed appropriate.
Now there is a "virtual com port" /dev/ttyUSB0. It is possible to test the connection to SPROG with a terminal programm like minicom or cu (from package uucp).
The installation of javacomm for JMRI was not so simple as Jonathan Miner on http://trainguy.dyn.dhs.org/~jminer/dcc describes. With the newer versions of rxtx I had no success. In http://stpaulterminal.org/software/jmri/ there was the explanation: The new namespace gnu.io.* requires chances througout the JMRI code, so it's necessary to use the old namespace javax.comm.*.
That's why (only?) the old version rxtx-1.4-16pre2.tar.gz and javacomm20 worked with JMRI. Some explanations can also be found at http://en.wikibooks.org/wiki/Serial_Programming:Serial_Java
May be, the current version of JMRI and javacomm don't like the devicename /dev/ttyUSB0. Then make a symbolic link: ln -s /dev/ttyUSB0 /dev/ttyS99 and add in the file javax.comm.properties a line like serpath3 = /dev/ttyS99.
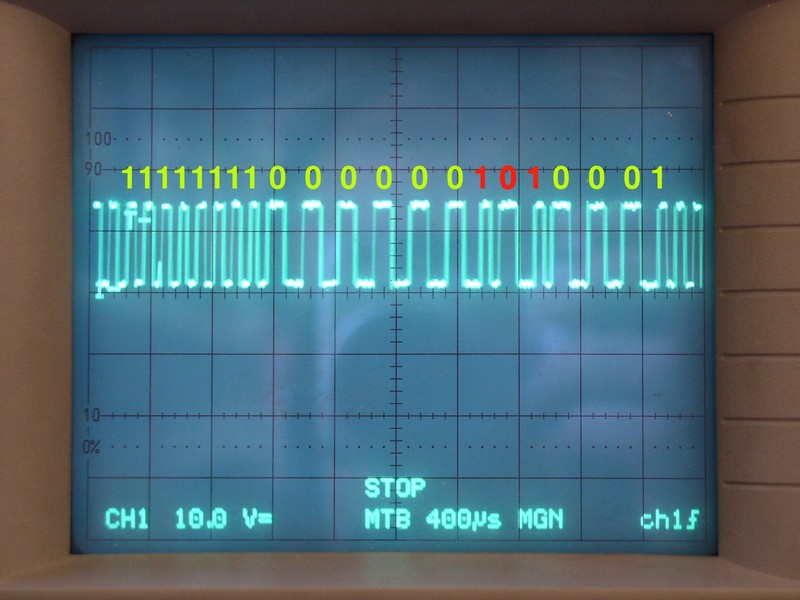
The picture shows the DCC signal on track. There is a DCC-packet, which has a preamble of (at least) 10 1-Bits (not all to be seen) followed by one 0, then the first byte contains the address: Here the decoder has the address (dec) 5 = (bin) 101.
For the measure it was necessary to connect only one of the two terminals of the oscilloscope to the track.
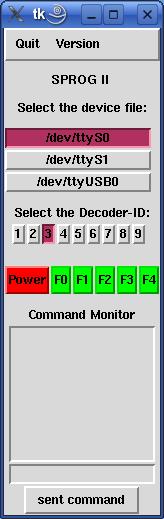 For testing purposes I wrote this little python program.
Without any warranty! It's possible to select the appropriate device and the
decoder-ID, then switch on the power on track (which means, sent the command
"+" to the sprog) and switch the function keys. Other commands can be sent
by the command line at bottom. The answer of the SPROG appears in the
"command monitor". Changing the CVs and many other things aren't implemented.
For testing purposes I wrote this little python program.
Without any warranty! It's possible to select the appropriate device and the
decoder-ID, then switch on the power on track (which means, sent the command
"+" to the sprog) and switch the function keys. Other commands can be sent
by the command line at bottom. The answer of the SPROG appears in the
"command monitor". Changing the CVs and many other things aren't implemented.
Sometimes the "+" or "-" (power on/power off) don't work with the button,
but with the commandline. This is the same internal function. That's curious!
I used it with the UniDecF-TN 1.2 from
http://www.mobatron.de (German), an 3A 1-channel-function-decoder (e.g. for
track switches ).
At "Chemnitz Linux User Group" I gave a lecture "Tux fährt Bahn" (in German) about DCC and SPROG. See http://archiv.tu-chemnitz.de/2007/0176/pub/data/digimoba.pdf.
13. November 2007
OpenSuSE 11.4, JMRI 2.12: Works! The steps above are not necessary. It's only necessary to change the owner of /dev/ttyUSB0 after plug in the SPROG and change the access rights of /var/lock, because uucp can't create lock-files.
Ralph Sontag, 23. August 2011.